Ghost & Gatsby Part 1 - Setting up AWS S3, CloudFront and Route53 to host the project
This is the first part of the series of posts to setup your personal website using GatsbyJS and Ghost deployed on AWS.
Here's what you will end up with after following this post:
- An public S3 (Simple Storage Service) bucket on AWS where all the files generated by Gatsby will be stored
- A CloudFront CDN instance that serves your content and provides an SSL layer for your website
- A couple of DNS records needed to make it all work with your domain If you don't have an AWS account, create one now here.
Create a public S3 bucket
Open the S3 console.
Click on Create Bucket.
Enter your domain name ( aotd.co in my case ) in the bucket name field.
Click Next. You don't need to edit anything in the second screen. Click Next again.
Grant public access by removing all the restrictions as shown:
Click Next and then Create Bucket.
Click on the bucket you just created to enter its settings.
Click on the Properties tab on the top and then click on Static website hosting.
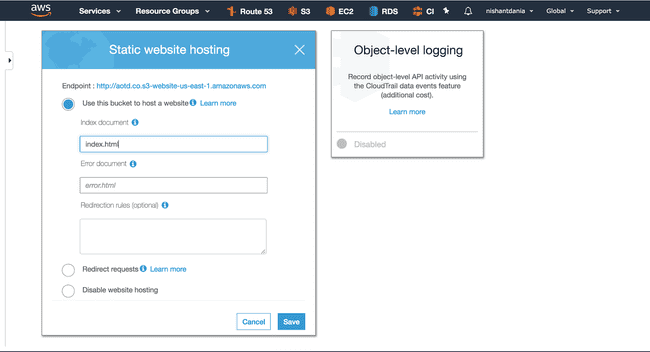
Choose the Use this bucket to host a website option, type index.html in the Index Document field, note down the endpoint for later and click Save:
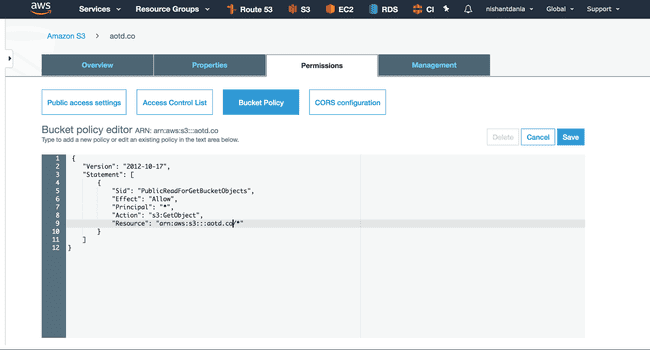
Click on the Permissions tab and then on Bucket Policy and type the following policy (Replace the aotd.co with your domain name):
{
    "Version": "2012-10-17",
    "Statement": [
        {
            "Sid": "PublicReadForGetBucketObjects",
            "Effect": "Allow",
            "Principal": "*",
            "Action": "s3:GetObject",
            "Resource": "arn:aws:s3:::aotd.co/*"
        }
    ]
}
Click Save:
That's it. You now have an S3 bucket setup to serve public files. Lets add SSL to this domain with CloudFront and Certificate Manager.
Create an SSL certificate for https
Open the Certificate Manager.
Click Request a certificate.
Choose Request a public certificate.
Click Request a certificate.
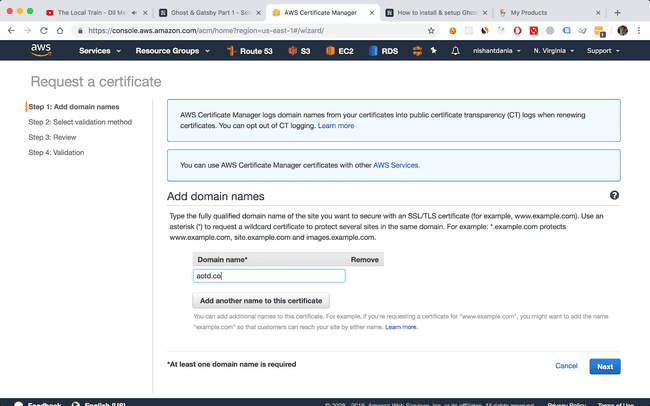
Enter your domain name and click Add another name to this certificate.
Enter ASTERISK.YOUR_DOMAIN (e.g *.aotd.co).
Click Next
Choose DNS Validation as the validation method and click Review.
Click Confirm and request.
In the Validation screen, click the domain name to option the dropdown menu and click Create Record in Route53. Click Create in the modal that pops up. Do this for both the domains (with and without asterisk). Click Continue. Wait a while for the certificates to get validated. This will take a few minutes.
You now have the SSL certificates for your domain name.
Take a deep breath and give yourself a pat. You've done a good job till now. We'll now create a CloudFront instance to serve your S3 bucket with this certificate.
Create a CloudFront instance to serve the S3 bucket via the SSL layer
Open the CloudFront console.
Click Create Distribution.
Click Get Started under the Web section.
Put the Endpoint of your S3 bucket (the full endpoint, not just the bucket name) in the Origin Domain Name.
Find the Alternate Domain Names (CNAMEs) field and enter the name of your domain. E.g. aotd.co
Choose the Custom SSL Certificate option under the SSL Certificate field and select the newly created certificate from the dropdown.
Leave everything as is and click Create Distribution button at the bottom of the page. This will take about 15 mins to get provisioned and you'll then see the status field saying Deployed. Wait for this to happen before proceeding further.
Create DNS records for your domain
Open the Route53 console.
Click on Hosted Zones in the sidebar.
Click on Create Hosted Zone.
Enter your domain name in the Domain Name field.
Click Create.
You also need to update the NS records in your Domain Registrar's website. In my case, I use GoDaddy. Click on the NS record that AWS provided for your hosted zone and update the TTL to 300. Note down the values of the NS records and click Save record set. Go to your domain registrar website and update the nameservers for your domain with the AWS ones. This step will be different based on your Registrar. Please google if you can't setup this. Or ask in the Ghost Gatsby Spectrum channel.
Click Create Record Set to create an A record.
Leave the Name field empty. Choose Alias Yes option and choose the Alias Target as the CloudFront instance you just created. Click Create.
That's it. Now your domain points to this CloudFront instance and will serve the files from the S3 bucket.
In the next part, you will setup a Ghost Blog on an EC2 instance.
For any questions/doubts/issues, head over to the Ghost Gatsby Spectrum channel.


